

Grandma All Square...
This tutorial is using a favorite of mine
The Grandma All Round pattern...
I have used the first 3 rounds and added 2 rows
as a boarder to make it into a square...
It is a perfect way to use as many scraps of wool you have
and I haven't really thought about following any colour combo
apart from the white boarder...
Do try to buy your boarder wool in one go though
as I was stuck with a wrong dye lot which was totally out of whack
with the one I had and only managed to get back to the shop
and find 2 balls that were the same...
I will remember this in future!!!
Here is the Tutorial...
8 ply
and size 3.5 hook...
English crochet terms used throughout,
America abbreviations are in brackets...
Starting round 1...


I have taken a few extra shots for this colour change
just to help those of you who are new to it...


Starting round 2...


Starting round 3...


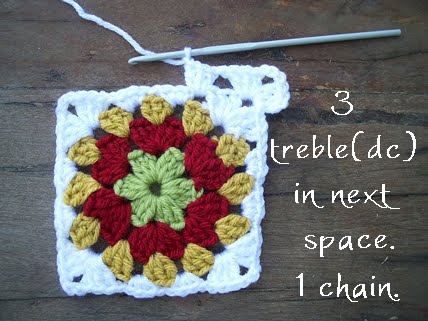
Starting round 4...


Starting round 5...


Now that your first motif is finished...
All the other motifs will be added as you go to this and others...
I have taken pictures of the joining process below...
and will try to explain as I go...
Below is the first picture showing joining a motif to two sides...
You motifs will be joined either to one side or two sides
depending on where the placement is...
but these pictures should give you the general idea...

You will start your last row as normal until you get to the second corner...
Instead of doing 3 chain...
you will do 1 chain, 1 dc(sc) into the corner on the motif you are attaching to
1 chain...and continue on with you 3 trebles(dc) as normal...

You will not do the next 1 chain
but 1 dc(sc) in the next space of your attaching motif...

Continue with you 3 trebles(dc) in next "normal "space...
and miss the 1 chain...and 1 dc(sc) in next attaching motif space...

Continue in this way till the next corner...
do the 3 trebles(dc) into the "normal"space...
miss the 3 chain and 1 chain, 1 dc(sc) in attaching corner,1 chain instead...
and continue finishing the 3 trebles(dc) as normal...


I do hope the pictures are helping!!!

Continue in this way...

Attach last corner the same as the others above...

As you finish the attaching follow the pattern as normal...
Now including the 1 chain in between...
 Join to end with a slip stitch...
Cut and sew in ends...

Now you have the making of your Grandma All Square rug...
A work in progress for many a quiet night...

If you are feeling like sharing please add your pictures to the flickr group...
Or drop me a line with you post details etc...
And remember my tutorial are free to use as you like...
and that included selling your finished items...
I can only imagine what you can come up with using this pattern...
Grandma pillow, throws, scarfs and ha even curtains...
Happy crocheting my dears...

62 comments:
WOW love this pattern and your tutorial is brilliant!!!
I'm going to try a tutorial soon but I cann't see it looking this good !!
Fantastic, lovely, and bright! Now if only someone could teach me lefty (I struggle so!)
Have a lovely weekend!
rainbow bright:
pure delight:
I too ❤ join-as-you-go method:
thanks for sharing:
☯
Thank you for another fabulous tut... your photos make it so much easier for us more visual people...
My Mum would agree with you about getting all the border wool in one go... My Mum knitted my Dad a cable jumper [he was a very, what we call, a very stocky man & this was many many moons ago] Mum didn't know about dye lots back then so bought some wool each week when she did the shop... The jumper knitted up & looked superb until the first wash...
Dad got such a lot of wear outta that jumper because it lasted so long, as he was only allowed to wear it as a fishing jumper, as it was in a multitude of different shades of green...
Why did it last so long?... we lived on a farm & fishing only happened about 2 or 3 times a year... ha ha
Sorry to take up so much of your time Michelle but I love your tut...
me again...
just had to say I have just looked again at your tut & it has to be the best tut for showing how to do the 'join as you go method' I've seen...
Good work...Dearie
What a clear, helpful tutorial. Your instructions and photographs will definitely launch a lot of crocheting around the world!
I particularly like the bits about "now is a good time to..." So true, and so helpful to mention that to new crocheter. And the dye lot hint will save the future of many projects!
Best wishes to you!
Thanks for posting your easy-to-follow tutorial, will definitely have to give this one a go.
Jak x
Привет. Очень красивый коврик. Так просто вяжется и так оригинально выглядит. Спасибо за подробное описание. У тебя очень красивые изделия. Very beautiful carpet. So simply matches and so originally looks. Thanks for the detailed description. At you very beautiful products.
So glad to have found you through SIBOL. I sure wish I had found this tutorial before starting my last grannie project. Love your's so much better than the basic I'm doing. Great colors and way to bust the stash.
Hope you don't mind if I follow. Stop by my garden anytime for a look and cup of tea.
Kate - The Garden Bell
Very pretty, I love the squares and the tutorial is brilliant as usual. Thanks so much.
theprairiegirl.com
I think you are my new BFF for showing this joining technique. Thanks a ba-zillion!
So beautiful! I love the white. I haven't made a granny in so long...many, many years...this may actually nudge me into it! Such clear instructions and photos...thank you!!
Ola.....
Muito lindo seus trabalhos, também gosto da combinar cores, parabéns...
abraços, Ivete.
Gorgeous Michelle...great tutorial!
Your blanket looks beautiful, thank you so much for this tutorial, it's so kind of you to share.
I'm going to bookmark this and start one as soon as possible.
:)
Hi!
Love ur web-site/blogg!!
If u visit my blogg, u will find a little something for u;)
brito
Great Tutorial, Thank you!
Hugs and lOve Suex
This was a really great tutorial. Awesome pictures.
Hello, how beautiful, I love squares garrny us, I have prepared my wool, I've been practicing,
thanks for this wonderful tutorial
maria
xxoo
Hey Michelle, love the tutorial, and thanks for showing how to join the squares I started something similar and made a real mess joining them together. This helps heaps. Cheers Leah
Gracias por tu tutorial para las que estamos en el proceso de aprender ingles... excelente!! los términos en ingles en la foto ayudan mucho.
Gorgeous.
But torture also - I am 140ish granny squares into my latest blanket project and now I want to start another!
thanks so much for sharing the tutorial for these beautiful squares. love the colors you picked for your blanket-- so pretty! always a bright spot to the day to see your blog!
I loved the rounds and now I love the squares too. Lovely work
Louise xx
Dear Michelle, Thanks.I published your blanket on my blog. CU, NKU liked. ... Congratulations to the hands of health.
I've been wanting to learn granny squares, and can definately follow your pattern! Thanks for being so detailed!
I have a few free crochet patterns - one is for "The Perfect Bath Puff" and the other is for "The Great Crochet Coaster Comeback." If you're interested, here's the link: http://www.HandmadeByAnnabelle.Blogspot.com
:)
Annabelle
wow, I just did a gre4at big scrolldown of all the pics in this post, it was like a stop motion animation ;)
Thank you very much for this great tutorial. I've added it on my blog and on my looooooooong list of projects to do ! ;-) Country & Cosily yours !
Michelle, thanks,thanks,thanks.Very happyyyyy.....:))))
Awesome tutorials, you are a very good teacher, I'm following you, thank you very much to share your knowleges with us!
Take care and have a nice weekend!
Lau/MimibU
Thank you so much!
It's a wonderful tutorial!!!
Great tutorial, thanks for sharing!
I made one and blogged about it here:
http://aseknc.blogspot.com/2010/08/sundays-squares_15.html
I definitely plan to make more of these.
Blessings,
(¸..•´ .•´ ¸¸.•¨¯`-: † :- Anita
http://aseknc.blogspot.com/
aseknc(at)gmail(dot)com
Hi Michelle!
thank you so much for sharing your beautiful pattern and the tutorial.
I made one for my craft room and love it!
I put a link for your blog in my post. I hope this is not a problem.
thanks,
marlene
Ps: http://pontinhosmeus.blogspot.com/2010/11/croche-encaixilhado-framed-crochet.html
gorgeous!
thax fr all those great tutorials... gonna try the out!
QUE LINDAAAA, AMEI O TUTORIAL, VOU FAZER UMA TAMBÉMMM
This is an amazing blanket and amazing tutorial, thank you so much!
Love, Maaike
I think kids would love this amazing afghan! If you're looking for more great afghan tutorials for kids (and teens), check out our newest collection: 12 Crochet Patterns for Kids, Tweens, and Teens. Have a great day!
Thank you so much! My worst thing is joining motifs, but this is easy and looks neat! I also like the granny square, and I am hoping, seeing as you add the squares as you go along, that this will be a granny square afghan I finish! I always seem to lose faith... NOT THIS TIME! i think I am going to be postinbg pregress on my own blog, with credit to your pattern of course: randomosrandomblog.blogspot.com
very good tuto ! bravo !
Love your blanket!! =)
Thank you for the tutorial, it is very easy to follow your instructions.. I`ve just finished my first doll blanket with this pattern.. =)
Dear Michelle - thanks a lot! This is great tute) I learn to crochet, I like it!!!
Omg this is the best tutorial ever!!
Merci pour le tutoriel. Ce granny est très agréable à crocheter et très agréable également à contempler. Quant à ton blog, une pure merveille !
Thank you so much! This is the most simple and easy to follow tutorial that I have come across.
I have gone from never having crocheted, to being just about to complete my first square over the course of the weekend.
I cannot wait to try your other tutorials as well.
Thank you once again!
Michelle:
I'm from Brazil and I love crochet and Knit. Your blog is amazing and adorable. Thank you for teaching us.
Bye,
Cris
Great tutorial and thanks for sharing!
I love your blanket!
Cris
GORGEOUS!
GRACIAS POR EL TUTORIAL. LOS COLORES SON HERMOSOS.
MARTHA
Thank you so much!!!! I was trying to find the epxplanation to make it ... hope you dont mind if I put your link on my blog
Hello Michelle!
Your blog is wonderful!!! You have a lot of beutiful and amazing things!!!
I'm trying to do the grannys but I can't...I was a beginer...
Do you know where can I find the same grannys in video???
Thanks a lot.
Hugs from Switzerland.
what a fantastic tutorial. I just pinned it on my board with a link back to your blog. Thank you so much for the time you put into posting this - I for one REALLY appreciate it :O)
Wow, this is the most beautiful crochet blanket I've seen. I'm going to try it :) One question: I see you cut off the ends, do you not sew them in? That would be so awesome if I could avoid all the sewing in of ends!!
Thanks again for the tutorial.
Que tutorial tan fantástico y que colcha de granys tan bonita!!!!!!!
Thank a lot!!!I made it!!!!Hurrrraaaa!!!I'm very happy now,it's a very good blog thank you!I'll follow it!!!!
Thanks a lot !!
My blanket is done ,i like.
Is there a US version. Im confused!help!
Precioso!!!! Muchísimas gracias por la explicación.
Besos/Bea
I would LOVE to crochet this pattern, but every time I visit your site my spyware program pops up and says malicious software detected. You might want to check and make sure your blog has not been compromised.
Hi...just wondering if you could give any idea of how much border colour would be needed - maybe how many metres to go round one square, and then I could work out how much to buy depending on how big the blanket would be. Thanks.
~Rachael
Hi Michelle
Thanks for sharing this great tutorial. You did a totally gorgeous crochet blanket. ♥
Greeting from Puerto Rico. :-)
-Sony
sonia-studio60.blogspot.com
This is a superb tutorial. One of the best I've ever seen. Everything so clear. This will help me to teach my nieces and others. I love crochet and your site inspires me.
Ciao, il tuo blog è favoloso e io mi sono subito iscritta... e queste coperte poi sono una favola...
http://acasaconmanu.blogspot.it se ti fa piacere passa a trovarmi
Post a Comment