
Granny Tissue Box Cover Tutorial
8ply yarn.
3.5mm crochet hook.
Wool needle.
Scissors.
Tissue Box 12cmD x 21.5cmL x 8.5 cmH
This pattern is in English crocheting terms.
English Abbreviations:
sl st - slip stitch
ch - chain
dc - double crochet
tr - treble
d tr – double treble
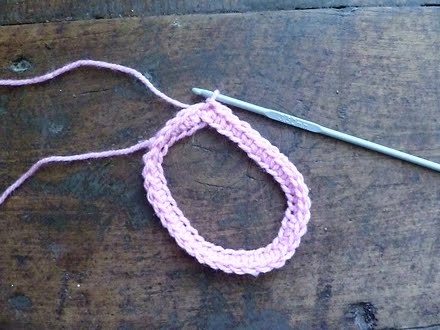
Ch 36, join with a sl st to form a circle.
Round 1…
1 ch, 1 dc into this ch.
1 dc in each ch to end, join with a sl st to first dc.
36 dc in total.
Round 2…
3 ch, 2 tr, 3 ch, 3 tr, 3 ch, 3 tr in this dc.

*Miss 2 dc. 3 tr in next dc* repeat * - *4 times (5 groups in-total)
Miss 2 dc. 3 tr, 3 ch, 3 tr, 3ch, 3 tr in this dc.

*Miss 2 dc. 3 tr in next dc* repeat * - * 4 times (5 groups in-total)
Join with a sl st to 3rd ch from beginning of round.
Sl st across into first 3 ch space.

Round 3…
3 ch, 2 tr, 3 ch, 3 tr, in this 3 ch space. 1 ch.
3 tr, 3 ch, 3 tr in next 3 ch space.

*3 tr in next space *, repeat * - * 5 times (6 groups in-total)
3 tr, 3 ch, 3 tr in next 3 ch space. 1 ch.
3 tr, 3 ch, 3 tr in next 3 ch space.

*3 tr in next space *, repeat * - * 5 times (6 groups in-total).
Join with a sl st to 3rd ch from beginning of round.
Sl st across into first 3 ch space.

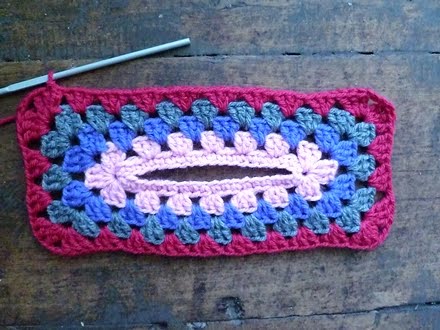
Round 4…
3 ch, 2 tr, 3 ch, 3 tr, in this 3 ch space. 1 ch.
3 tr in next space, 1 ch.
3 tr, 3 ch, 3 tr in next 3 ch space.

*3 tr in next space *, repeat * - * 6 times (7 groups in-total)
3 tr, 3 ch, 3 tr in next 3 ch space. 1 ch.
3 tr in next space, 1 ch.
3 tr, 3 ch, 3 tr in next 3 ch space.
*3 tr in next space *, repeat * - * 6 times (7 groups in-total).
Join with a sl st to 3rd ch from beginning of round.
Sl st across into first 3 ch space.

Round 5…
3 ch, 2 tr, 3 ch, 3 tr, in this 3 ch space. 1 ch.
3 tr in next space, 1 ch, 3 tr in next space, 1 ch.
3 tr, 3 ch, 3 tr in next 3 ch space.

*3 tr in next space *, repeat * - * 7 times (8 groups in-total)
3 tr, 3 ch, 3 tr in next 3 ch space. 1 ch.
3 tr in next space, 1 ch, 3 tr in next space, 1 ch.
3 tr, 3 ch, 3 tr in next 3 ch space.
*3 tr in next space *, repeat * - * 7 times (8 groups in-total).
Join with a sl st to 3rd ch from beginning of round.
Sl st across into first 3 ch space.
Round 6…Note d tr in corners!!!
4 ch, 2 d tr, 3 ch, 3 d tr, in this 3 ch space. 1 ch.
3 tr in next space, 1 ch. 3 tr in next space, 1 ch, 3 tr in next space,1 ch .
3 d tr, 3 ch, 3 d tr in next 3 ch space.

*3 tr in next space *, repeat * - * 8 times (9 groups in-total)
3 d tr, 3 ch, 3 d tr in next 3 ch space. 1 ch.
3 tr in next space, 1 ch. 3 tr in next space, 1 ch, 3 tr in next space, 1 ch .
3 d tr, 3 ch, 3 d tr in next 3 ch space.
*3 tr in next space *, repeat * - * 8 times (9 groups in-total).
Join with a sl st to 4th ch from beginning of round.
Sl st across into first 3 ch space.

Round 7…thru to Round 14…
3 ch 2 tr in this space.
3 tr, in next and all spaces to end.

Join with a sl st to 3rd ch from beginning of round.
Sl st across into first space.

Round 15…plain…
Repeat round 7 once.
Join with a sl st to 3rd ch from beginning of round.
Sew and trim ends.

Round 15…shell pattern…
*6 tr in next space, 1 dc in next space.* repeat * - * around base to end.
Join to start of round with a sl st. You will have 16 shells in total...
Sew and trim ends.


I do hope you enjoy making your own Granny Tissue Box Cover...


52 comments:
This is cool! I've always wondered how these come together - now I know! Thanks so much for taking the time to make this tutorial.
Caz from Never Knew :)
Wow! This is wonderful! Great! Thank you for this tutorial!
Greetings from Germany
Kirstin (the cookie monster)
Great!!!
This is really beautiful and now I know how that goes.
Thank you very much for this tutorial.
Have a nice Weekend - Greetings,
Marion
Wow! Fab tutorial. Thank you. x
Thanks!
This is great!
~X~ Karin
wonderful
full of photos
congratulations, i loved it
Dear Michelle, you are wonderful ! Yes: this is exactely a project I wanted to make and there is your tuto ! Thank you one thousand times (and even more). I'll let you know when I've made my first one. Cheers from Belgium. Rachel D.
Oh this is just FABULOUS Michelle :)
Thank you so much for this lovely tutorial, I look forward to having a go very soon!
I hope you have a lovely weekend :)
Wow! Fab tutorial. Thanks
xxx
Thanks again Michelle: I've made 2 of them since yesterday. One for my mother and one for me. You can see them here (http://countrycosy.wordpress.com/2010/09/18/granny-tissue-box/). Something tells me there will be others ! ;-)
Have a great weekend.
Rachel D.
Lovely tutorial! Thankyou so much I am going to have to make one some of those for xmas presents. PS I am going to put a link up with my post for the handmade christmas challenge :-)
fab tutorial, you make it look so easy!! Can't wait to make one.
Louise xx
Wonderful! I'll definitely be making this one, (and will be sure to link to you of course), great to make as a gift for a fellow knitter/crocheter/vintage lover, thank you so much. Vanessa x
Thanks voor this wonderful tutoriol!
I'am going to make this one!
xx Fenny
Gonna try this one ASAP! Should I post the photos somewhere?
Oh Michelle, you have done it again! Amazing tutorial and beautiful creation! You have been busy, I'm going now to catch up on all your fabulous doings!
Have a lovely day.
That is so cute! I don't crochet but can still appreciate the fine workmanship!!!
I love this tutorial! I can't wait to try it. It is so cute.
Wow Thanks! I love this, I am going to try this today..Your amazing Michelle!
Hi Michelle :)
I have made a tissue box using your wonderful tutorial - Thank you!
if you like to see it
http://gillianhamilton.blogspot.com/2010/09/there-is-something-very-sweet-about.html
Tutorial 5* :))
bjs
nélia
Brilliant, thank you !
Hugs Suex
ah, thank you!!! I must make one ASAP!
I have just discovered your blog and it is glorious!!! The tissue box cover is definitely on my todo list!! Thank you for a beautiful read!!!!
Jane
Thank you very much for a very nice tutorial. This is really awesome. I would love to make some.
dining room tables
GRAZIE CIAO ELE
Thanks so much for this great project! I made one, slightly different in chunkier yarn, and posted about it with a link to your pattern. I'll try to upload the photo onto your flikr group, but in the meantime, do stop by and check it out
http://www.creativejewishmom.com/2010/12/handmade-holiday-crochet-a-tissue-box-cover.html
many thanks for the pattern, I will soon be posting fotos of my results!
one question however: after making the corners and moving downwards, my work doesnt seem to hug the box properly and i'm forced to decrease every now and then to make it tighter. Is being kinda loose normal? Will it tighten up by itself later towards the end?
Thank you for this great tutorial. I've made one as you can see on http://www.handysandy.web-log.nl
Regards from Holland, from Sandra
Thank you so much for sharing this really nice project with us. I've just made one with some 4 ply yarn and hook 3mm. And love the result :-)
I feel like trying it NOW! Thanks so much for the tutorial!
Thanks for this tutorial! You are very generous. I made one a few weeks ago and will blog it properly with links soon!
Thank you so much for posting this tutorial!! I just made a Tissue Box Cover at the request of my mother, and it looks AMAZING! She has now requested another one, and so has my Auntie :-)
Here's a link to my finished cover on Raverly: http://ravel.me/SharaDesigns/gtbc
I did it! Wanted to do it for years but could't find a pattern and now I did it. Thank you for sharing and the great tutorial!
I did it! I wanted to make one for years but couldn't find a pattern. Will make another one today. Thank you for sharing and the great tutorial!
Thank you for the tutorial! I just finished mine with 3 color combinations of pink, light pink, and white... and added 2 pom poms to it ^^
So gonna try your other tutorials!
here's my cover:
http://alleyesonally.blogspot.com/2011/03/granny-tissue-box-cover.html
I love this tutorial, and I really love your blog. I hope you don't mind that I added your tutorial to my blog :) I hope you approve. Please have a look:
www.vintagekatiejean.blogspot.com
Hello Michele!
Thank you very much for this so wonderful tutorial! I love your work and your blog (excuse my english, I'm french...)You can see my boxes on my blog http://piouch.canalblog.com/
See you
Piouch
Sorry: Michelle... Have a good day.
What is 8 ply yarn? Can someone give me an example? Sorry to sound so dumb. :-(
Thank you so much for sharing this tutorial, It was fun and easy to make. I've posted today if you'd like to have a look.
http://gooseberryjamman.blogspot.com/2011/07/my-crocheted-home.html
Thanks again, Love your Blog.
Karen :)
Hi Michelle
Love your blog and am making the tissue box cover at the moment.
Can you explain Round 15 ....plain...
I'm still fairly new to the crochet scene and still learning.
Trisha
Very,very,very nice.
Thanks, Julia
from Tenerife,Canary Island.
juliagarpra.blogspot.com
Hello Michelle!
Lovely cover! I've made the same for my kitchen.
If you wish you could see my creation here: http://olgasoleil.blogspot.com/2012/02/rainbow-set.html
Thank you very much for your tutorial!
Have a nice day!
Olga ☼
Hello!
I am the editor of AllFreeCrochet.com and would love to feature your tutorial on my site with full credit to you. I know my readers would just love it and in return would generate some nice traffic to your site. If you agree and would like us to feature your project, our readers will simply click the link to your blog to get your full tutorial. please email me at jbenoit@primecp.com if this sounds like something you might be interested in. I think it could definitely be a great benefit for both of us! I look forward to hearing from you soon,
Jenny
Thank you very much for your tutorial. I just made one.
Thank you so much for the tutorial - I found it very easy to follow and love the result, which I made in a pretty yellow and cream combo. You can see it here if you're interested: http://vividcrochet.com/2012/09/17/tissue-holder-updated-granny-style/
Now very keen to try some of your other lovely projects!
Thanks so much for your lovely tutorial - easy to follow and great result. I made it from yellow and cream - looks lovely I think! If you want to see it you can do so here: http://vividcrochet.com/2012/09/17/tissue-holder-updated-granny-style/
Thanks again!
I love it so much I want to do it but some how I get struggle I like very much and thanks for tutorial but something I couldn't understand the reading and its hard to me to read it but I want ask you a favour if u can do it please in video well very easy to me or may for other I love to see do it in video if you can I'm very appreciate it and thanks for everything you done and nice project and even wouldn't be thinking for doing tissue box until I see this tutorial I love it very much and thanks again and appreciate it more if you do a video will be nice.
Heloo..I love your blog, thank you for sharing.Feel like trying.This is my first project.Greeting from Indonesia
OMG this is a nice tutorial..thank you so much for sharring! Lots of love from Holland!
Hi can I ask, how do you change the yarn? Like how do you add in another colour?
Post a Comment