After what seems like so long
since I did a tutorial...
A am back...
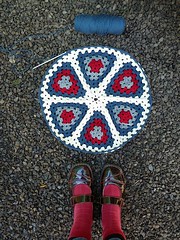
With a
Grandma Star Hexagon
that I am hoping you love...
I adore hexagons
because they are so versatile
you can easy join them
and make lovely patterns
and mix the colours as well...
Here is a peek at a unusual project I have started
using Grandma Star Hexagons and adding Pentagons...
So without further ado I will begin...
3.5mm hook
8ply yarn
needle and thread and scissors to trim...
I am writing this in English crochet terms
with American in Brackets...
Chain 4 join with a slip stitch
to form a circle.
Round 1...
1 chain, 12 dc(sc) into circle.
Join with a slip stitch to beginning...
Round 2...
2 chain, Yarn Over hook insert into same stitch,
Yarn Over hook pull up a loop, Yarn Over hook and draw through 2 loops,
Yarn Over hook and insert into same stitch,
Yarn Over hook pull up a loop, Yarn Over hook and draw through 2 loops.
Yarn over hook and draw through all 3 loops remaining. Pic 1...
*5 chain miss one dc(sc)
Cluster into next dc(sc)
(cluster is as follows):
Yarn Over hook ,insert into next dc, Yarn Over hook and pull up a loop,
Yarn Over hook and draw through 2 loops,
Yarn Over hook and insert into same stitch,Yarn Over hook pull up a loop,
Yarn Over hook and draw through 2 loops.
Yarn Over hook and insert into same stitch,
Yarn Over hook pull up a loop,Yarn Over hook and draw through 2 loops.
Yarn over hook and draw through all 4 loops remaining*. Pic 2...
Repeat * - * until there is 6 petals and one dc remaining.
5 chain.see note below...
Join new colour into the last chain of the 5 chain. Pic 3...
Slip stitch into top of cluster.
This will be into the loop that is on the left hand side. Pic 4...
Slip stitch across to 5 chain space. 1 chain.
Remember to work over your ends.
Keeping them to the left of work helps. Pic 5...
Round 3...
6 dc(sc) in this and all 5 chain spaces to end
join with a slip stitch to first dc. Pic 6...
Round 4...
3 chain to count as first Treble(dc) ,
Treble(dc) into next 2 dc(sc), 3 chain. Pic 7...
*Treble(dc) into next 6 dc(sc), 3 chain*
* - * Repeat 5 times. Pic 8...
Continue around. Pic 9...
3 treble(dc) into last 3 dc(sc) remaining,
Join with a slip stitch into top of 3rd chain at beginning...pic 10...
36 treble(dc) and 6 – 3 ch spaces.
Fasten off and sew and trim ends...
These motifs can be joined
by simply omitting the second chain in the corner and slip stitching to
adjacent motif corner. Use this method for all joining of sides...
I do hope the tutorial has worked out
and has been helpful...
And of course full of granny goodness...